Setup Connectivity
Setting up connectivity configures everything you need to securely access StreamShuttle on any of your devices from anywhere. Although you don't NEED to follow these instructions exactly, doing so will ensure everything is set up correctly and as quickly as possible.
This may seem a little daunting, but don't worry too much. It is easy to restart everything from scratch, so you cannot really mess anything up. If you run into trouble, you can always contact us for help making sure everything is set up correctly. You only need to set this up once.
The first step is to decide whether you need DDNS. Most residential ISPs provide only dynamic IP addresses, so you will most likely need to enable it. This service ensures you can always access StreamShuttle, even if your IP address changes. You can find out more about DDNS here.
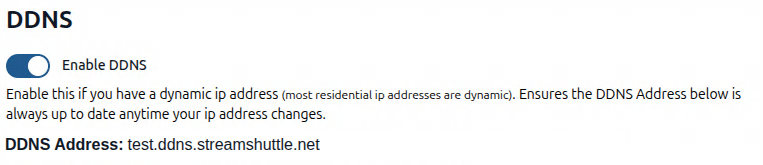
Once DDNS is enabled, decide whether you want to set up the VPN. Enabling the VPN is essential for securely accessing StreamShuttle from anywhere. You can find out more about how a VPN works here.
Before doing anything else, make sure you have installed WireGuard. Visit WireGuard.com to download and install it.
After WireGuard is installed, you can begin configuring the VPN.
If the warning "VPN Server Needs To Be Restarted!" appears during configuration, you can disregard it until you have made all changes. Restart once after everything is configured rather than after every change.
When performing most VPN actions, you will be prompted for administrator permissions. These permissions are required to start or stop the system VPN service.
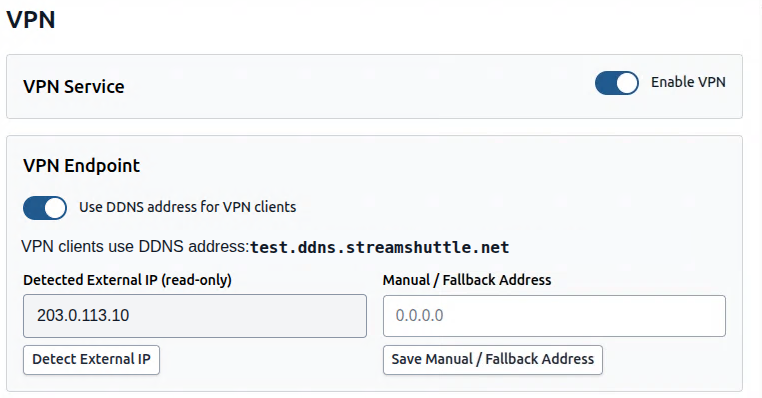
By default, VPN clients use the detected external IP as the server endpoint. StreamShuttle first tries to detect your public IP by querying your router. If that is unsuccessful, it queries an IP address lookup service (Cloudflare 1.1.1.1 by default).
If DDNS is enabled, turn on "Use DDNS address for VPN clients" to use your unique DDNS address instead.
The "Server Configuration" section lets you configure the server settings. Most of the time, there is no need to adjust them. However, the "Port" is picked randomly during the first run. It is unlikely, but the selected port could conflict with something else. Any port from 8999 to 49999 should work.
Make sure the WireGuard VPN server keys exist by clicking "Generate VPN Server Keys" at least once. You can do it now.
The "VPN Server Actions" let you start, stop, update, and restart the VPN server. Use "Save and Restart VPN" after the configuration is complete.
The Automatic Port Forwarding area can automatically open the port for the VPN. When enabled, StreamShuttle tries to open the port via UPnP or NAT-PMP. If this does not work, you will see a "FAILED" message and must manually forward the port in your router.
If you need to manually forward the port, you can usually find instructions by searching for your router's model number and "open port" or "port forward" in any search engine.
Lastly, generate VPN configurations for any clients that will connect to StreamShuttle. Clicking "Add New VPN Client" adds a new client entry. Change the "Client Name" to something meaningful so you know which device it belongs to. For example, you could use "John Smith's iPhone".
We will return to installing the WireGuard VPN configuration on the client devices shortly. First, make sure the SSL certificate is configured correctly.
Make sure the VPN is enabled or disabled as intended before generating the final certificate. This allows the VPN address to be added as a "trusted address". Click "Regenerate Certificate" to do this.
Restart the WireGuard VPN by clicking "Save and Restart VPN".
Restart the StreamShuttle Control Panel.
- Restarting the control panel ensures all components use the newly generated SSL certificate. In the top-left corner of the control panel, click "App->Quit", then restart StreamShuttle.
The VPN server is now configured. Next, install the SSL certificate and VPN configuration on each client device that will access StreamShuttle. The following sections describe the required steps.
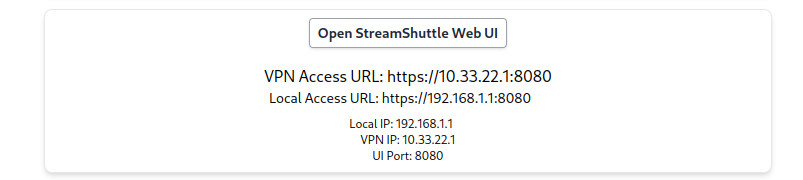
The Overview page in the Control Panel shows the Local network URL used for local certificate setup.
Start by installing the SSL certificate on the client devices.
Depending on the device and its operating system, there are multiple ways to copy the certificate to it.
Getting the SSL certificate onto the device
Option 1
If the device is on the same network as StreamShuttle, you can use the following procedure to install the certificate on almost any device.
First, make sure the machine running StreamShuttle and the device where you want to install the certificate are on the same network. Suppose I want to install the certificate on "My iPhone". I would open the web browser on "My iPhone" and visit the "Local network URL". The "Local network URL" is shown in the StreamShuttle Control Panel and will probably differ from the screenshot above.
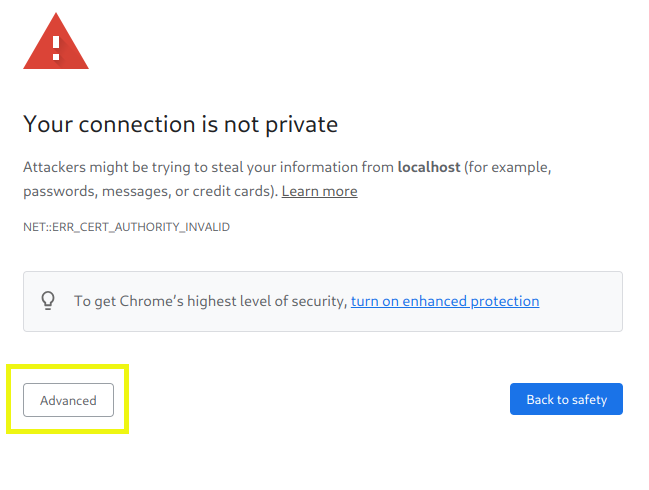
On iOS, you MUST use Safari because certificates can only be installed through Safari. You will probably see a "Certificate Error". Temporarily accept the certificate so StreamShuttle can load.
The next section shows how you can temporarily bypass this warning screen until the certificate is installed.
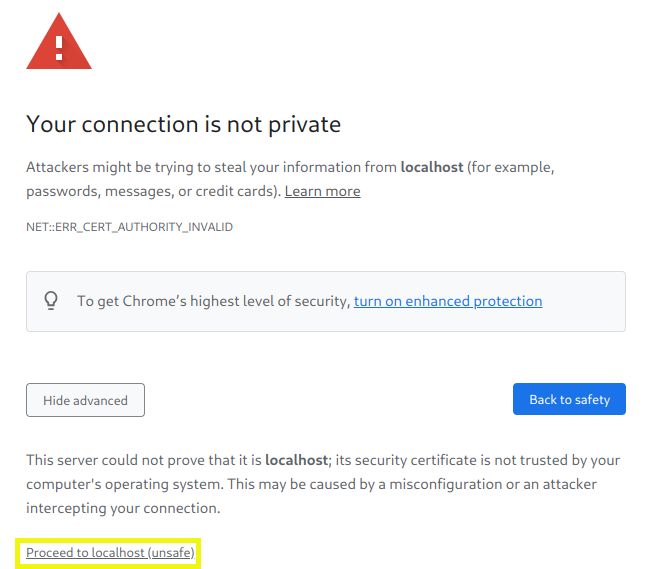
Chrome example
In Chrome, first click "Advanced". Then click "Proceed to X (unsafe)" to load StreamShuttle.
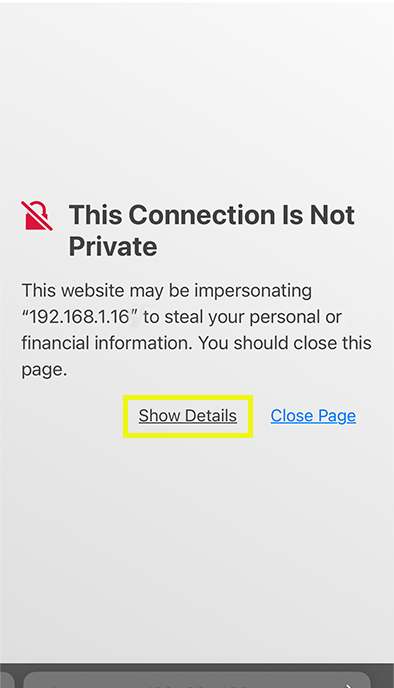
Safari example
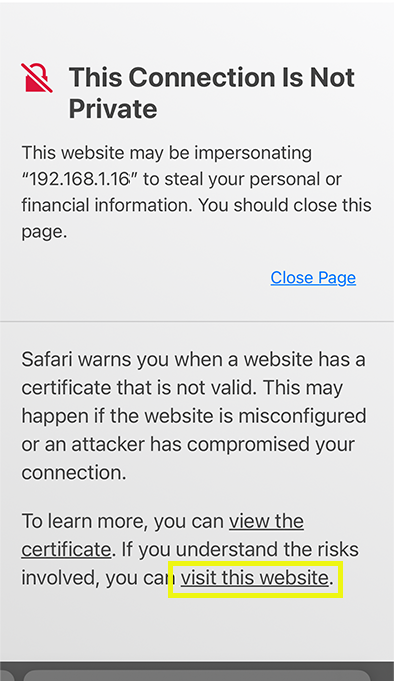
In Safari, first click "Show Detail". Then click "visit this website" to load StreamShuttle.
The process is similar in other browsers.
You should now see the StreamShuttle login page. You may need to refresh the page or close and reopen Safari before login works because it may not yet recognize the newly allowed certificate.
Downloading the Certificate
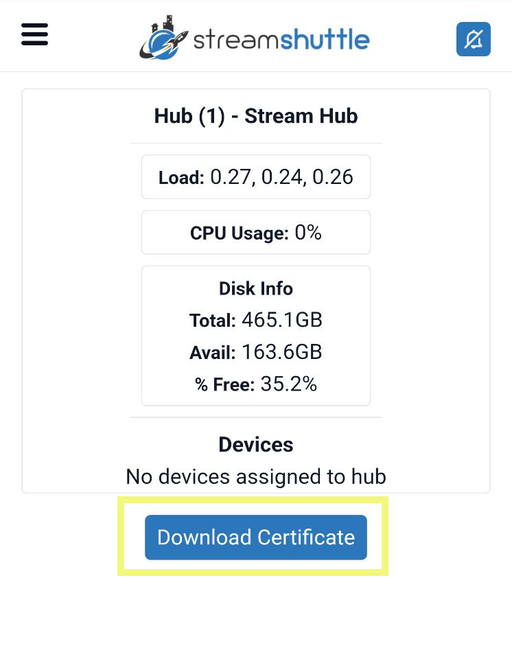
Next, download and install the certificate. Log in to StreamShuttle (the default username and password are admin/admin123). The next page is the dashboard, where you will see a button labeled "Download Certificate". Click it to download the certificate to the device.
Option 2
You can simply click "Download Certificate" in the StreamShuttle control panel and manually copy it to the device via SD card, USB drive, AirDrop, or email.
Installing the certificate
Now that the SSL certificate is on the device, install it.
iOS
* If you don't see this message, head to your downloads folder in the "Files" app and open the certificate. The message should then appear.
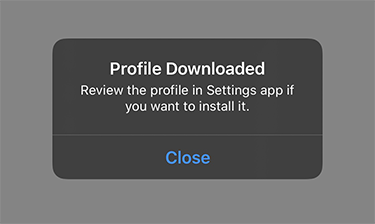
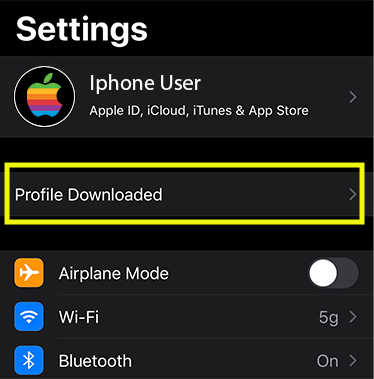
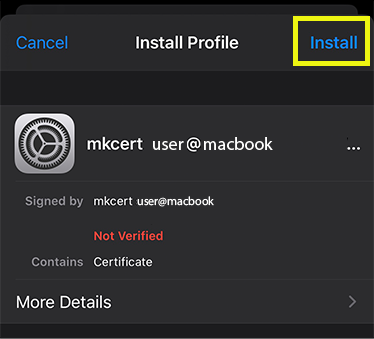
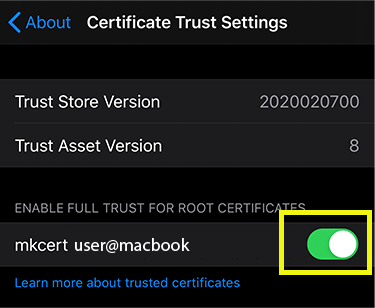
Android
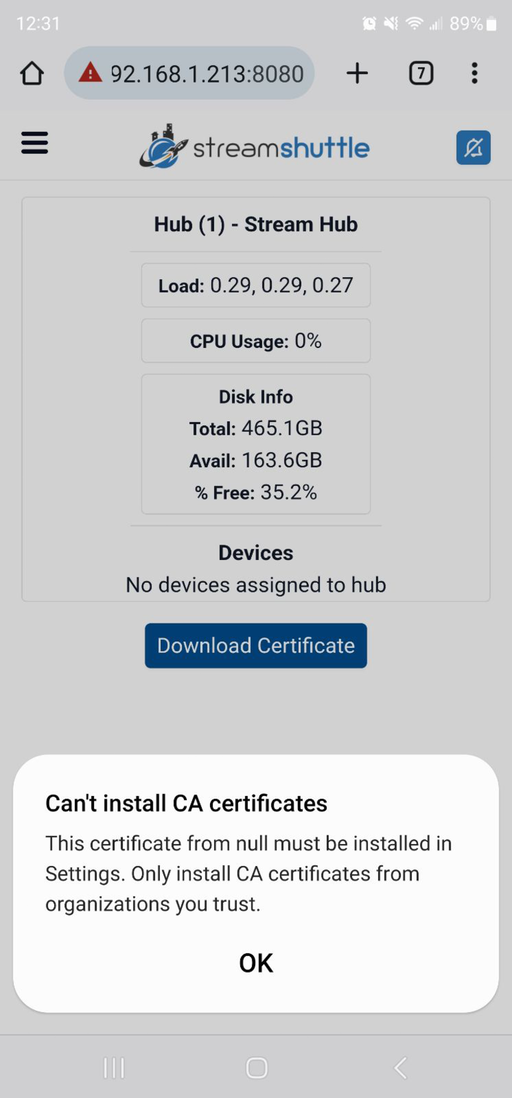
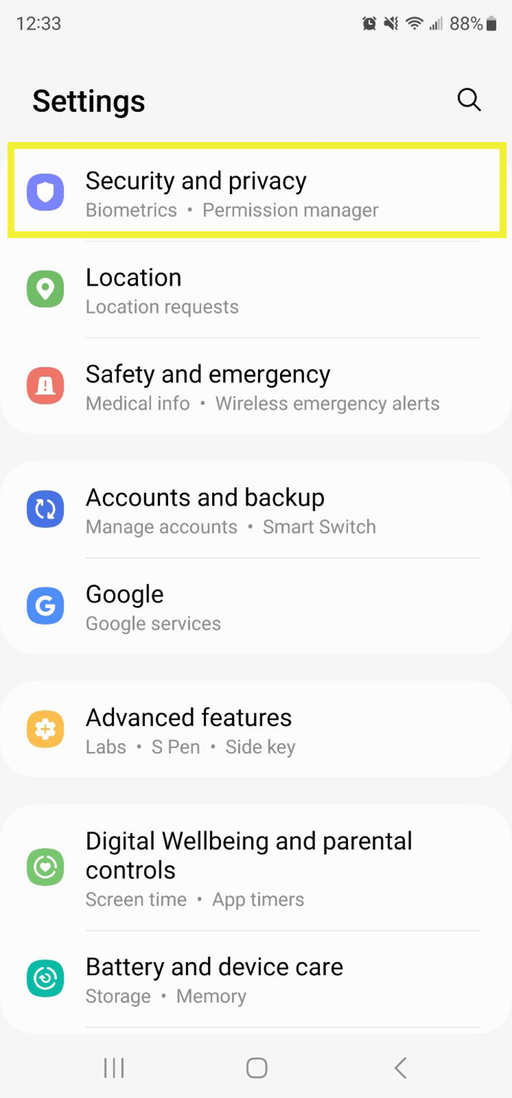
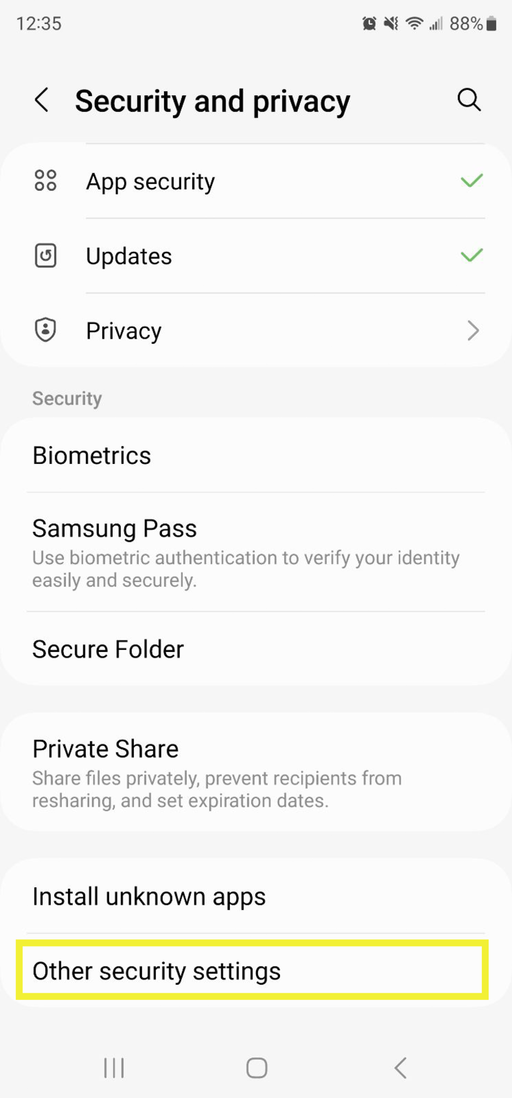
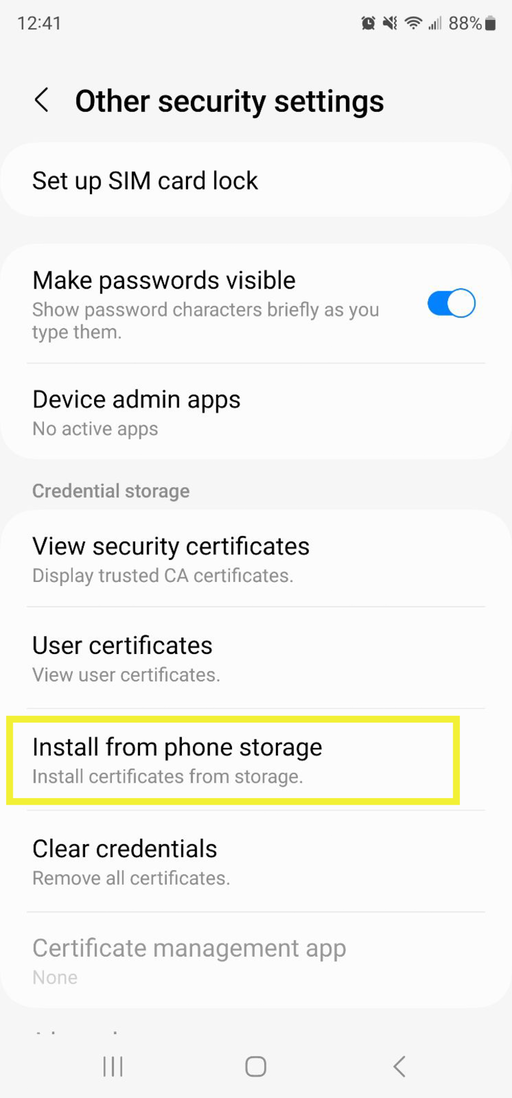
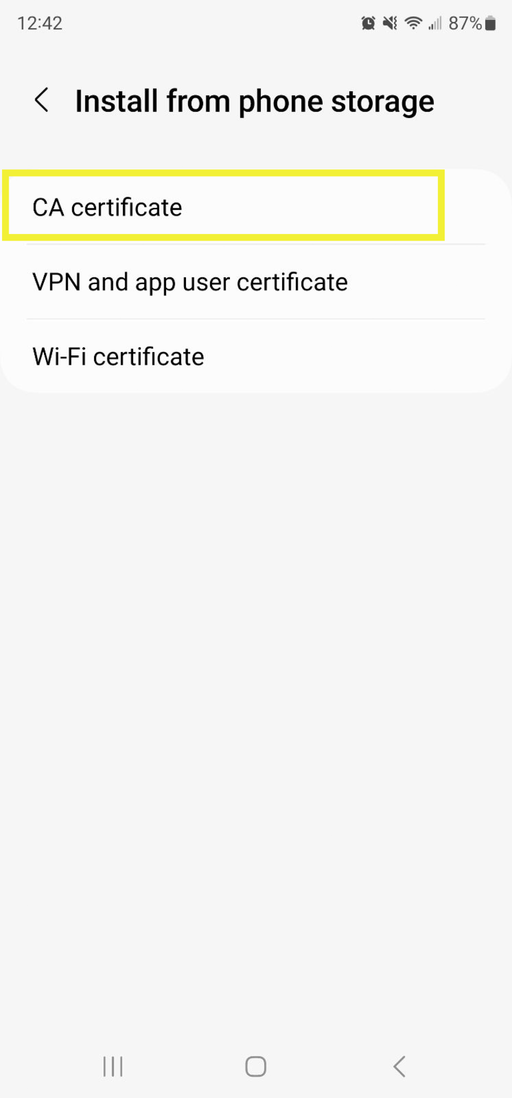
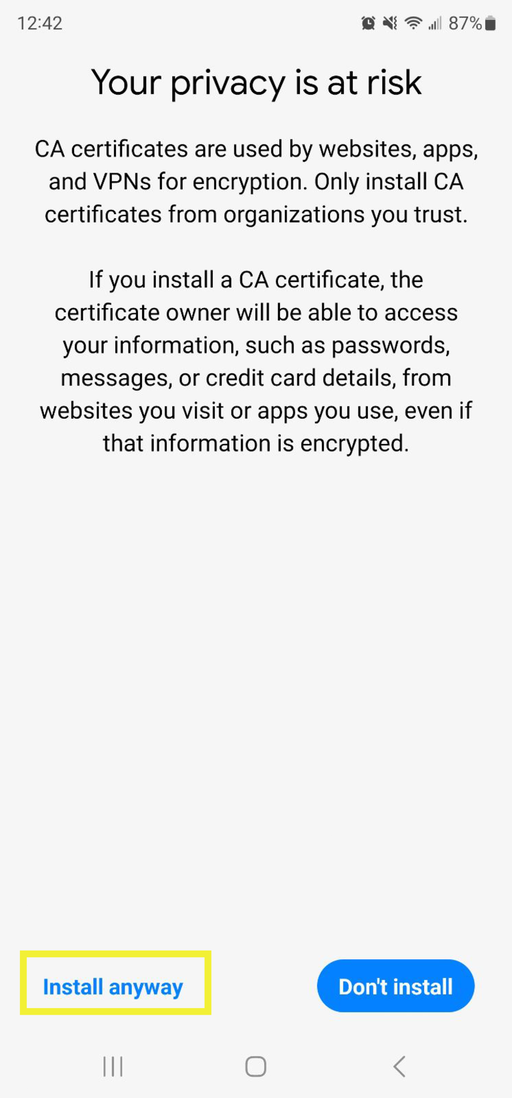
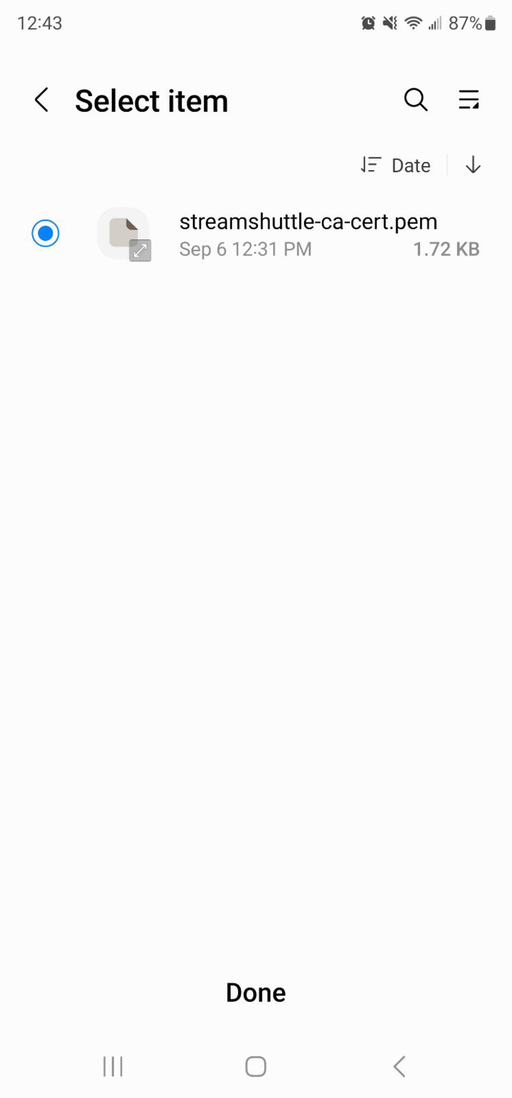
Add the VPN configuration to the device
First, make sure the WireGuard client is installed on the device. You can install WireGuard through the device's app store or from the WireGuard download page.
If the client device is a phone, tablet, or other device with a camera, the easiest option is to add the client VPN configuration from the StreamShuttle control panel:
- In the VPN Clients area of the VPN Configuration section, make sure a client entry exists for the device.
- Click "Show Config QR Code" to open a pop-up containing the VPN configuration as a QR code.
- In the WireGuard app on the client device, click "Add a new WireGuard Tunnel".
- Select "Create from QR code" and use the device's camera to scan the QR code. WireGuard will automatically import the configuration.
Alternatively, download the client configuration from the control panel and manually move it to the device via SD card, USB drive, AirDrop, or email.
Test connectivity and install the StreamShuttle app
The last step is to make sure the VPN works as expected, then install the StreamShuttle app.
Test connectivity
Let's make sure we can access StreamShuttle over the VPN.
In the WireGuard app on the device, make sure the newly created tunnel is enabled.
Then open the device's web browser and access StreamShuttle using the "VPN Access URL". If StreamShuttle loads without certificate issues, you can install the app and finish configuring cameras in StreamShuttle.
If you cannot access StreamShuttle through the "VPN Access URL", review the VPN settings, port forwarding, and firewall configuration before continuing.
Install the StreamShuttle app
iOS
While visiting the "VPN Access URL" in the device's web browser, click the "Share" option, then click "Add to Home Screen". That's it! StreamShuttle should now be added to your Home Screen and work like any other app.
If the icon is NOT the StreamShuttle logo, the SSL certificate may not be installed correctly, or Safari may need to be fully restarted to reflect the changes. Make sure the certificate is installed, fully close and restart Safari, and check that the "lock" is displayed as expected. Then remove the current app and try adding it to the Home Screen again.
Android
When you first visit the "VPN Access URL" in the device's web browser, you should see a prompt to install the application. If not, open the Chrome "Options" and select "Install App". That's it! StreamShuttle should now be added to your Home Screen and work like any other app.