Device
See Configuring Your Device for a brief walkthrough.
When initially creating a device, not all configuration areas are available. After saving, you will see every configuration section. You can add a "Name" and click "Create" to continue configuring the device with all sections available.
Basic settings
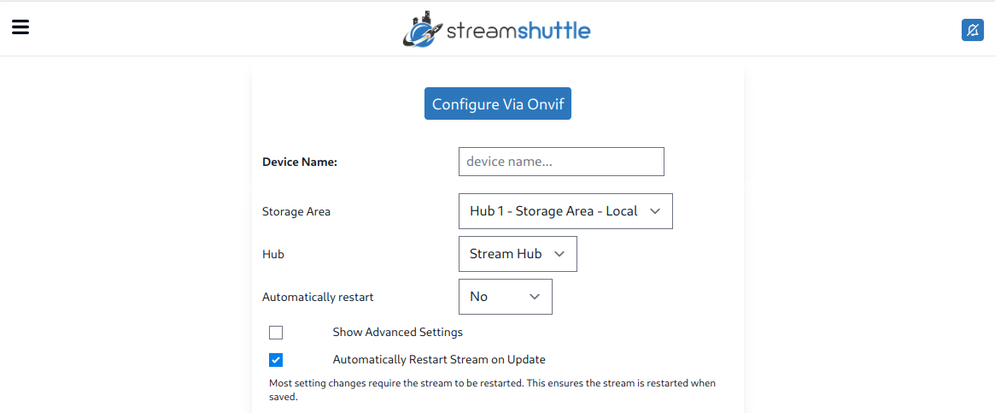
Configure via ONVIF automatically imports device configuration using the ONVIF protocol.
The following basic settings are visible by default:
| Attribute | Description |
|---|---|
| Device Name | Descriptive name for the device. |
| Storage Area | Where media created by this device should be stored. |
| Hub | Which hub should manage and monitor this device. |
| Automatically restart stream | Should we automatically restart the stream if it crashes for any reason? |
| Show Advanced Settings | Reveals additional advanced options. |
When advanced settings are shown, additional fields are available, including Automatically Restart Stream on Update. Most setting changes require the stream to be restarted; this option ensures the stream is restarted when saved.
Input source settings
Configure the camera's video and audio sources.
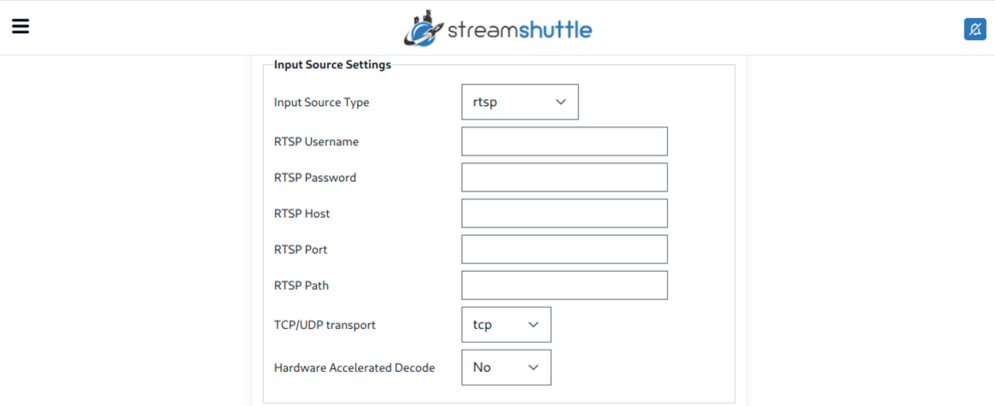
The available input source types are RTSP, URL, Local Device, and UI.
RTSP
An example RTSP URL may look like this: rtsp://someuser:[email protected]:554/ch0_0.h264
The parts of the URL correspond to these configuration fields:
- Username => someuser
- Password => somepass
- Host => 192.168.1.27
- Port => 554
- Path => /ch0_0.h264
| Attribute | Description |
|---|---|
| RTSP Username | Username to connect to the device. |
| RTSP Password | Password to connect to the device. |
| RTSP Host | Host where the device is located. |
| RTSP Port | Port used to connect to the device. |
| RTSP Path | Path used to connect to the device. |
| TCP/UDP transport | Protocol the device uses. Usually TCP. |
| Hardware Accelerated Decode | Should we try to use hardware accelerated video decoding? |
| Use Substream | Should StreamShuttle use a substream for detection, live view, and montage? With 4K cameras, this can significantly improve performance because StreamShuttle does not need to decode the higher-resolution stream. |
| Use Substream -> Substream Input Source URI | The entire URI should be used. If the substream requires a password, include it here. Example: rtsp://username:[email protected]:554/cam/realmonitor?channel=1&subtype=1 |
| Use Substream -> Substream Input Options | Any additional options to pass to FFmpeg. RTSP streams generally use TCP, so the default value is "-rtsp_transport tcp." You may need to remove or adjust it if your camera uses a different protocol. |
URL
Use this when the source is an MJPEG, JPEG, or other video source.
| Attribute | Description |
|---|---|
| URL Stream Type | MJPEG, video, or JPEG (snapshot). MJPEG: moving JPEG image source. Video: any other valid video file accessible over HTTP. JPEG (snapshot): creates a video by periodically retrieving an image from the specified source over HTTP. |
| Input source URI | The URI of the media resource. |
| JPEG Update interval | When the JPEG (snapshot) stream type is selected, determines how frequently to retrieve the image. |
Local Device
Use a device connected directly to a hub as an input source. This includes webcams and other video capture devices that FFmpeg can use as media sources.
| Attribute | Description |
|---|---|
| Input Device Path | The path used to identify the device we want to capture from. |
Generally the "Re-encode Video" option will need to be enabled when utilizing this input type.
OS-specific information is available when you select this source in StreamShuttle.
UI
This feature is still in progress, but you can set up a "UI" device to turn any device with a web browser and camera into a monitored device. For example, you can use a cellphone as a security camera.
Please contact support if you would like to know more about this feature.
Monitor settings
Configure how and what StreamShuttle monitors from the device.
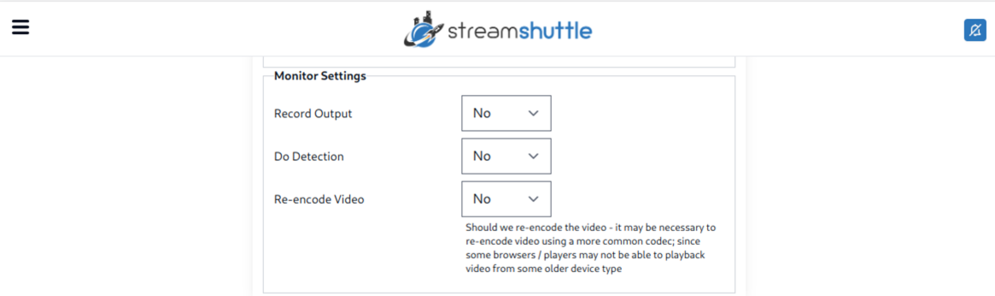
Record Output, Do Detection, and Re-encode Video are visible by default and are set to No. Additional recording options appear when Record Output is set to Yes. Additional detection options appear when Do Detection is set to Yes, and audio detection options appear when Detect Audio is enabled.
| Attribute | Description |
|---|---|
| Record Output | No by default. Should StreamShuttle record media from the device? |
| What to Record? | Available when Record Output is set to Yes. Activity Only or Everything. When Activity Only is selected, activity events are created only when an object, motion, audio, or manually triggered activity is detected. When Everything is selected, media is continually recorded in five-minute intervals by default. |
| Maximum Length of activity event | Available when Record Output is set to Yes. Number of seconds before StreamShuttle creates a new activity event. |
| Seconds before and after activity to capture | Available when Record Output is set to Yes. Number of seconds before and after activity to include in the activity event. |
| Do Detection | No by default. Should we detect activity for this device? |
| Detect Motion | Available when Do Detection is set to Yes. Should we look for motion activity? |
| Detect Objects | Available when Do Detection is set to Yes. Should StreamShuttle look for object activity? |
| Detect Audio | Available when Do Detection is set to Yes. Should we trigger activity when audio activity is found? |
| Detect Audio - Noise Threshold | Available when Detect Audio is enabled. The threshold at which audio is considered noise, in dB. 0 is very loud, and -100 is low. For example, if audio detection is too sensitive, try increasing this number closer to 0. |
| Detect Audio - Look back seconds | Available when Detect Audio is enabled. How many seconds should we look back when monitoring audio. |
| Detect Audio - Look back seconds threshold | Available when Detect Audio is enabled. How many of the "look back seconds" must contain audio before activity is triggered. |
| Detect Button Presses | Available when Do Detection is set to Yes. Detect button presses from specific devices (usually a doorbell) |
| Record Audio | Available when Record Output is set to Yes. Should we record the audio in addition to the video? |
| Re-encode Audio | Available when Record Audio is enabled. Re-encoding audio with a more common codec may be necessary because some browsers and players cannot play audio from older devices. |
| Re-encode Audio - Codec | Available when Re-encode Audio is enabled. Codec used to re-encode the audio. AAC by default. |
| Re-encode Video | No by default. Re-encoding video with a more common codec may be necessary because some browsers and players cannot play video from older devices. |
Notification settings
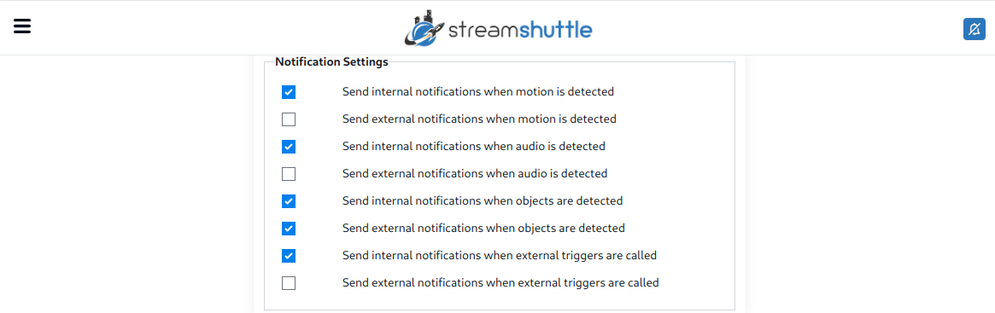
These options appear when Do Detection is enabled. They control which alerts this device emits and do not change recording configuration. The defaults are a good starting point for most people because they limit alerts to likely new object activity. After tuning features such as motion zones, enabling motion alerts may make sense if there are not too many false positives.
External notifications include push notifications, Discord notifications, and any future integrated services. Internal notifications appear only while you are using the app interface.
| Option | Default |
|---|---|
| Send internal notifications when motion is detected | Yes |
| Send external notifications when motion is detected | No |
| Send internal notifications when audio is detected | Yes |
| Send external notifications when audio is detected | No |
| Send internal notifications when objects are detected | Yes |
| Send external notifications when objects are detected | Yes |
| Send internal notifications when external triggers are called | Yes |
| Send external notifications when external triggers are called | No |
PTZ settings
Configure the device's pan, tilt, and zoom (PTZ) settings.
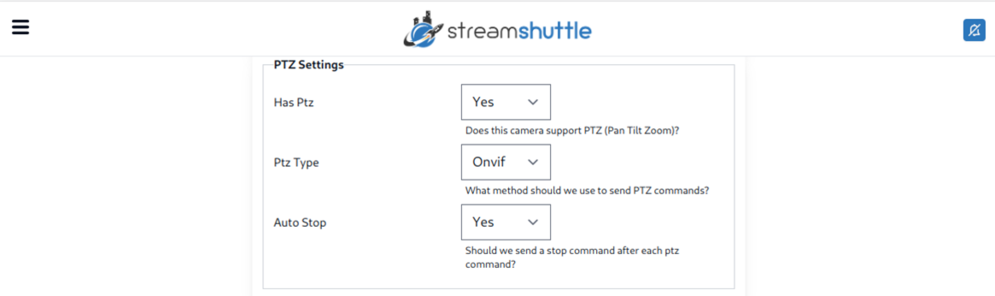
| Option | Description |
|---|---|
| Has Ptz | Yes / No. Does this camera support PTZ (Pan Tilt Zoom)? |
| Ptz Type | ONVIF / HTTP. Select the method used to send PTZ commands. For ONVIF, the camera must have been created using the ONVIF wizard. |
Live audio settings
Configure live audio playback and whether the device supports two-way audio.
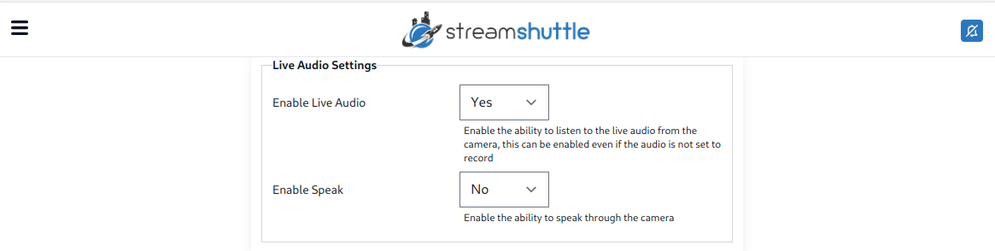
Speak Method and its codec, rate, channels, format, headers, digest, and URL fields appear only when Enable Speak is set to Yes.
| Option | Description |
|---|---|
| Enable Live Audio | Enables live audio from the camera. You can enable this even when audio is not recorded. |
| Enable Speak | Enables speaking through the camera using two-way audio. Currently tested only with Amcrest and Reolink devices. |
| Speak Method | HTTP or Neolink. HTTP posts audio to the device using the specified parameters. Neolink must be installed manually for Reolink devices. |
| Codec | The audio codec the camera expects. |
| Rate | The audio rate the camera expects. |
| Channels | How many audio channels to encode. |
| Format | Which format is the audio in. |
| Headers | Any additional headers the device may require. |
| Digest | Does the device require HTTP digest authentication? |
| URL | The URL used to post the audio to the device. |
Retention settings
Configure optional retention limits for this device. Enter -1 to use the storage-area and system-wide retention settings instead.
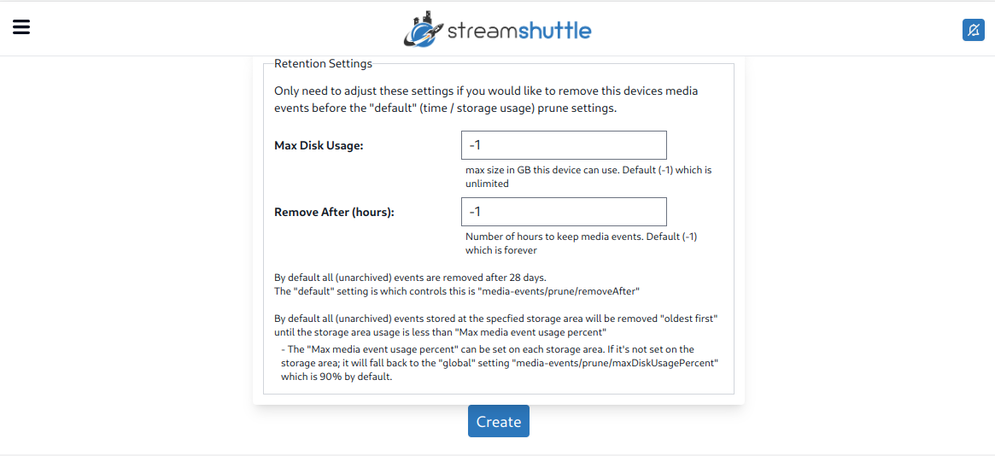
When storage use exceeds its limit, StreamShuttle removes the oldest unarchived events until usage is below the limit. The storage-area limit applies when set; otherwise, StreamShuttle uses the system-wide media-events/prune/maxDiskUsagePercent setting, which defaults to 90%.
The system-wide media-events/prune/removeAfter setting controls the maximum event age and defaults to 672 hours (28 days).
| Option | Description |
|---|---|
| Event storage limit (GB) | Maximum storage for unarchived media events from this device. Enter -1 for no device-specific limit. |
| Event age limit (hours) | Maximum age for unarchived media events from this device. Enter -1 for no device-specific limit. |
Schedule settings
Configure the device's run schedule. When enabled, you can select time slots when the monitor should be on or off.
The scheduler takes precedence over the "Automatically Restart" option. The device is always restarted during an active time slot and stopped during an inactive time slot.
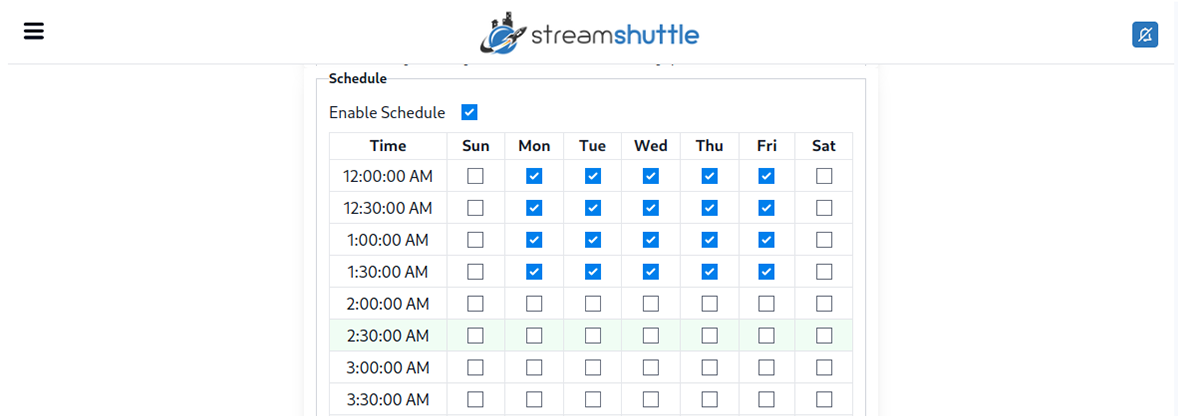
This image shows a partial view of the 48-row schedule grid and demonstrates selected weekday slots.
Click a row in the "Time" column to toggle all days for that time slot. You can also click any day header to toggle all times for that day.
The current time slot is highlighted.
| Option | Description |
|---|---|
| Enable Schedule | Toggles the scheduling functionality and the time slot grid. Once enabled the device will only run during the selected time slots. |
Activity zones
You can edit the activity zones by clicking "Edit Zones" from the device edit page, or the actions drop-down on the device listing page. This option will only be visible once motion or object detection is enabled.
* Device stream will need to be restarted after updating any zone information before the changes will take effect.
Activity zones configure what StreamShuttle considers activity on a per-zone basis. The editor also includes global motion and object detection settings. There are currently two types: motion zones and object exclusion zones.
The object detection settings apply globally to the entire frame.
Motion zones
When a device is created, it has no zones, and StreamShuttle uses the entire frame for motion detection. After you define a zone, StreamShuttle looks only within each defined zone for activity.
Object exclusion zones
StreamShuttle uses the entire frame for object detection. After you define an exclusion zone, StreamShuttle ignores a detected object if the object's center is within that zone.
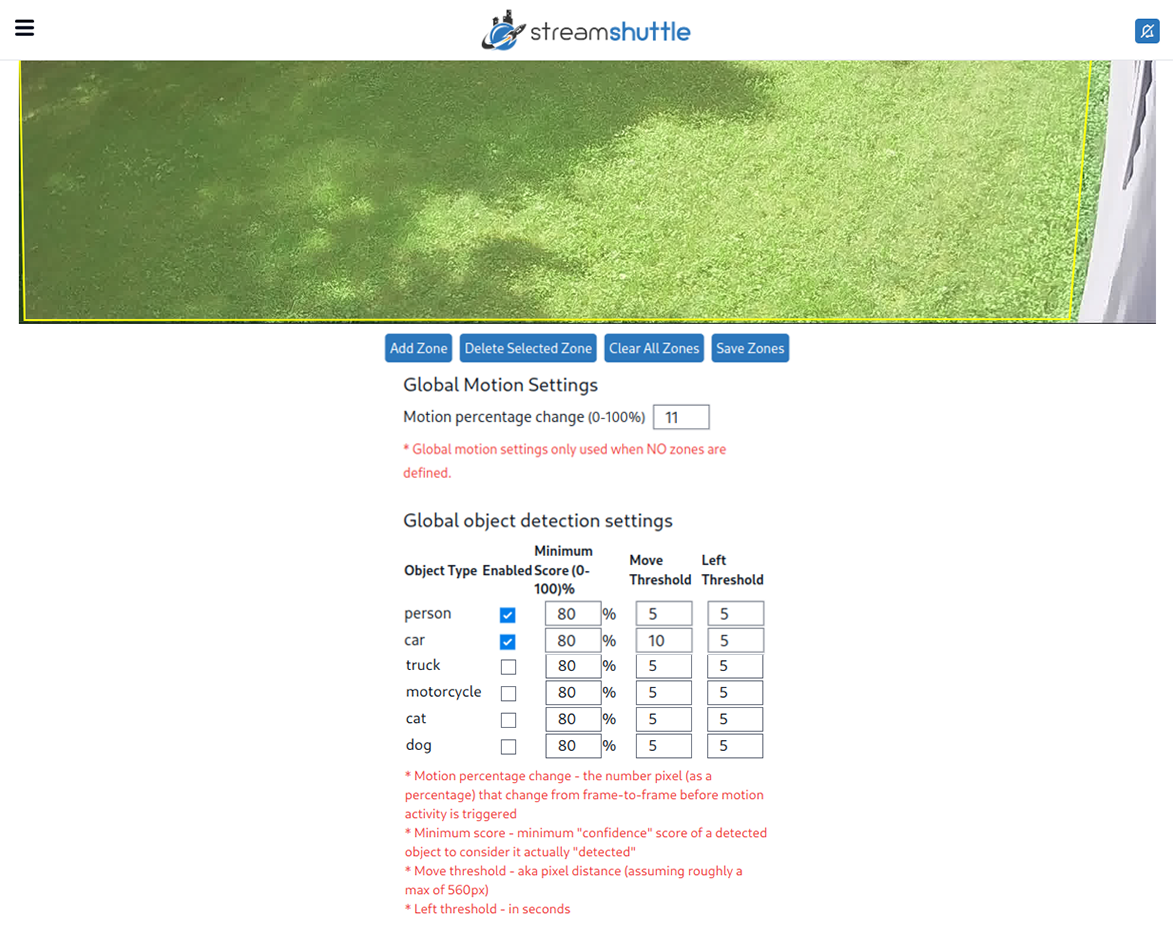
| Option | Description |
|---|---|
| Add Motion Zone | Defines a new motion zone. After clicking this button, click around the image to create the zone. Click the starting point again to complete it. |
| Add Object Zone | Defines a new object exclusion zone. After clicking this button, click around the image to create the zone. Click the starting point again to complete it. |
| Delete Selected Zone | Deletes the currently selected zone. |
| Clear All Zones | Clears all zones. |
| Save Zones | Saves all zone settings. |
Click an existing zone to display its settings. Selecting a zone does not change or save it; click "Save Zones" only after making changes.
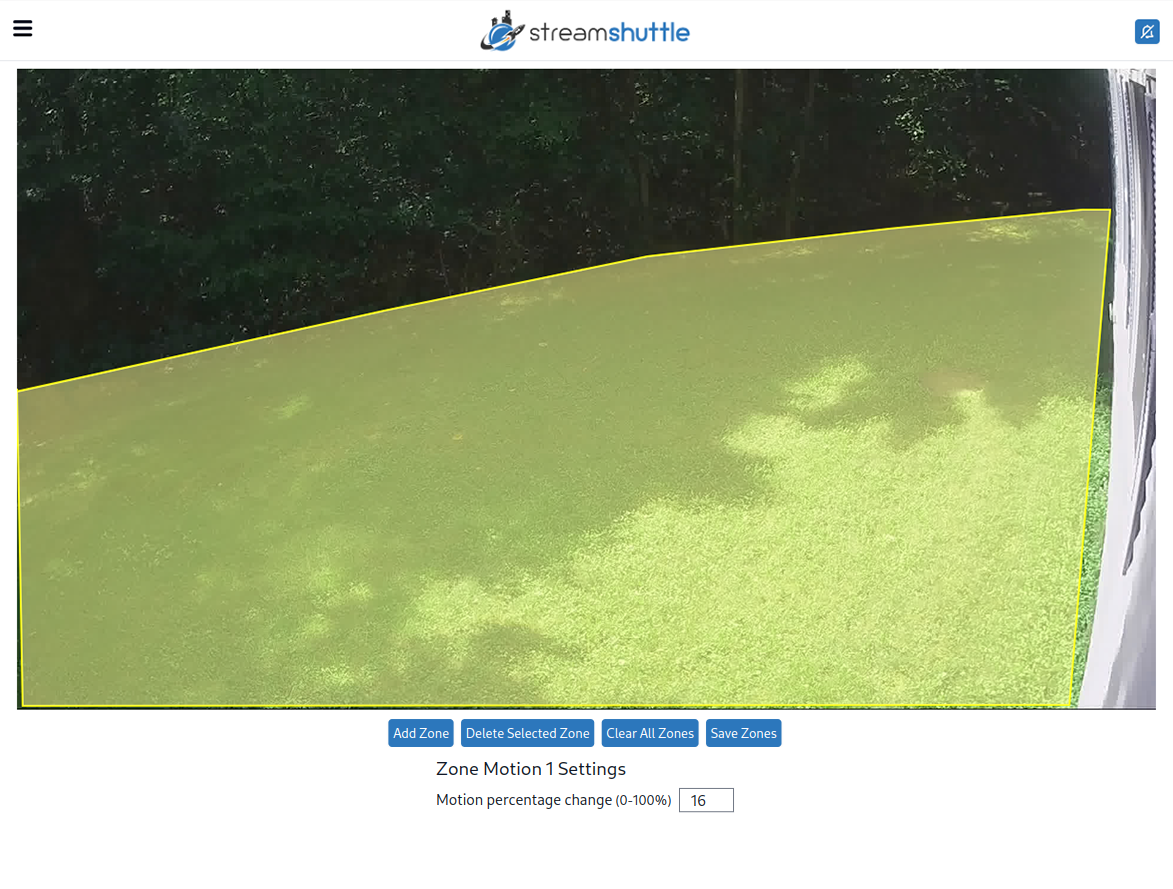
After changing any zones, click "Save Zones" and manually restart the device stream.